STAFF REVIEW of Rover Mechanic Simulator (Xbox One)


Friday, October 22, 2021.
by Adam Dileva

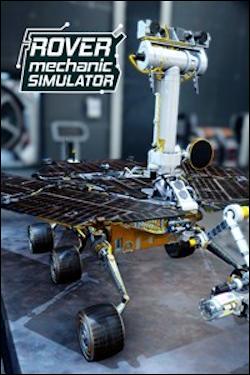
Rover Mechanic Simulator Box art Well, I’ve done it; I’m a fully-fledged mechanic. That is, within the confines of Rover Mechanic Simulator, developed by Pyramid Games who has a few simulator games under their belt, as well as Mars titles, so naturally they eventually blended together. There’s no shortage of simulator games in recent years, and while there’s almost a sim for every job out there, there’s finally one for those that want to be a mechanic that works on Mars rovers.

Your job is simple; repair broken and malfunctioning Mars rovers. While there’s no traditional campaign with an overarching narrative, you instead simply start in some sort of facility, most likely the maintenance or mechanic department of some Mars colony, and begin working once you pass through the doors after briefly looking out the only window you’ll see during your career. Get used to working in a windowless box, because that’s your life now as a rover mechanic.

Looking at your trusty tablet you’ll get to choose which job to take based on the company requesting the fix, the model of rover, a general clue of what’s wrong with it and the rewards for completion. With just a couple rover types to fix, you’ll go from not knowing anything about them to knowing exactly how many screws you’ll need to unscrew and put back for every rover since you’ll do many different repairs/jobs on the same rovers.

Missions all play out the same way, only differing on what you have to repair on the rover or how many steps it takes to go from acceptance to job completion. First you check your tablet and decide which job you want to undertake. There’s always some sort of correspondence from the client saying what happened and what’s not working, such as the camera isn’t working because of Mars dust, or the rover is only moving in circles. Sometimes you’ll get preliminary information about exactly what parts are going to need to be replaced, but this is only for the easier beginner jobs.


Now that you’ve chosen which rover to repair, you’ll need to use the nearby terminal to maneuver a crane to pick up the rover that’s placed in a crate and move it onto your working table. The camera is acting up and glitches, on purpose, though this can be fixed with a skill point later on if it really annoys you. The crane section only takes about 5 seconds, so it’s not really an issue though.

Now that the rover is on the mechanic table, it’s time to fix what’s wrong. But how do you know what parts need replacement? I don’t know about you, but I don’t know the first thing about Mars rovers, so even if you told me what part to take out, I’d have no clue where to even start. This is where you start to analyze individual parts of the rover, and I mean every individual part. Down on the ‘D-Pad’ puts you into inspection mode, which you then hold down ‘A’ for a moment on a specific piece and it will then show you how much durability said part has left as well as it now glowing green, yellow or red to correspond with how much durability is left. You’ll get an exact percentage and everything as well as the part name, as well its icon so you know what you’ll need to print on your 3D printer if you need to replace it.

As soon as you identify what the faulty part is, you then can remove it. You do this by pressing Left on the ‘D-Pad’ to go into disassembly mode, able to take parts of the rover off one by one. If it’s a simple and singular part, you’ll hold down ‘A’ to unscrew the screws, one by one. Thankfully you don’t need to hover over them with the slow moving cursor, but it can be time consuming. Also, you don’t need to keep track of them or anything thankfully. Where some of the time consuming mechanics come into play though is when certain pieces and parts can’t be removed until others blocking it is removed.

For example, to get into the battery and CPU housing of one of the rovers requires you to remove the solar panel on its back. To do that though you’re going to have to remove about a dozen or so other smaller components, each of which has one to a dozen screws each. Getting to a single part you need to replace can take upwards of ten minutes at times simply because it’s buried behind, underneath or inside other components. But you’re a professional, so you’re used to this of course.


You’ve found your faulty part and need to replace it, so this is where your industrial 3D printer comes into play. The 3D printer can print any part you would ever need to rebuild a new rover, so you’ll need to scroll through a lengthy list of parts to find exactly the one that you need. Thankfully the icons are large and color coded to correspond with each type of rover, but you have to find the exact part to replace, as there any many similar parts with confusing names. Choose your part, wait anywhere from ten seconds to two minutes as it prints and it will be ready for use. You can even print whole sets for major parts that house many smaller pieces, but those are costly to print and take longer obviously. If you’re smart you’ll queue printing the parts you need as soon as you identify the ones need replacing to cut down on wait times while you work on other tasks like disassembly.

Now you’ve gotten your newly printed part, it’s time to assemble everything back and hope that you didn’t miss anything. Just like disassembly, but in reverse order, hitting Right on the ‘D-Pad’ puts you in assembly mode, highlighting any missing parts with a feint blue shadow. Thankfully you can replace parts in any order as long as you see that shadow, but you’ll still need to put all the screws back.

Now that your rover is back in one piece and working order, it’s time to calibrate before you mark the job complete. Plug in the calibration tool and then you get to play another mini-game that reminds of the old classic game Pipe Dream on NES. Electricity needs to get from the start and end up in the finish, but you only have a certain amount of specific tiles to do so. On top of that there are red and green nodes that have to have certain voltage options placed, so you need to not only get the pipes to connect, but also end up with the correct voltage to complete the mini-game.

Now that you’re all done replacing faulty or damaged parts and calibrated the rover, it’s time to hand in your completed job. Doing so will earn you a chunk of XP and money that can be used on skill points and currency for 3D printed parts. Now you go back to your tablet, choose the next job and repeat the process over again. That’s about it, though there are some caveats and some more intricate pieces and electronics to replace, but that’s the basis of the gameplay loop.

There’s a few other tools you’ll need to utilize to replace specific parts. If it’s an electronic part you’ll have to fix the PCB’s. This is done at a different bench, but you’ll open up the component and then have to replace certain transistors, capacitors and other small parts, done via the 3D printer of course. To take these parts out you’ll use a soldering iron to remove them, then also soldering the new pieces back into place.


Sometimes you’ll also need to clean parts. If a part is too dirty you won’t be able to analyze it to see its quality. This is done at a different bench and you simply need to hold down ‘X’ as you move the cursor over the whole part until it’s clean. The only annoying part to this is that you then need to reattach it to the rover to analyze it, unable to do so from this bench. This means you might have to reattach a dozen pieces so you can scan it only to find out it’s broken and needs replaced, causing you to disassemble it all again. Eventually you’ll have more than enough money to print any part without thinking about it, but it’s a small oversight mechanically in my opinion.

So you’ve got a ton of broken parts that you’ve printed replacements for, so what do you do with all these worthless components? Recycle them of course! You’ll get a small amount of money in return, nothing that will make a difference, but at least it gets them out of your inventory.

The final major thing to mention is the skill points. Every time you level up you get one skill point to put into one of three trees. The three different trees focus on different mechanic perks. One gives bonuses to disassembly and assembly time, other is about lowering costs and the third is what I focused on first, allowing me to eventually have all parts automatically analyzed simply by looking at the rover, saving me a ton of time. Once you level up a bit and put some points into the skill trees, nearby everything you do becomes less of a chore and happens much quicker.

Aside from the rovers themselves, there’s nothing else to really look at given you’re stuck in a windowless cubed room. The rovers are quite detailed with their dozens of intricate and small components, though the textures themselves are quite low resolution which can be distracting. As for its audio, I hope you like to hear the same few tunes on repeat for hours, and while there’s a few different radio stations you can tune into, these repeat as well. Aside from that, all you’ll hear is the sound of your electric screwdriver when removing or replacing screws for every part. I highly suggest putting some Spotify on in the background as you repair your rovers to keep your sanity.

For how tedious the gameplay loop is, I found myself oddly addicted to wanting to repair another rover after completing one. There are some awkward controls and a lot of monotonous repetition, but it’s oddly satisfying at the same time. If you ever wanted to know what it would be like to be a Mars rover mechanic, under twenty bucks will introduce you into its tedious career.

**Rover Mechanic Simulator was provided by the publisher and reviewed on an Xbox Series X**


Overall: 6.0 / 10
Gameplay: 7.0 / 10
Visuals: 7.0 / 10
Sound: 3.0 / 10

Comments

Site Statistics

Registered Members: 81,172
Forum Posts: 725,969
Xbox One Titles: 6,502
Xbox 360 Titles: 1,086
Xbox 360 Kinect Titles: 95
Xbox 360 Arcade Titles: 586
Original Xbox Titles: 987
Staff Reviews: 2,612
Member Reviews: 10,339
News Articles: 16,557
Screenshots: 39,566
Xbox 360 Achievements: 45,112
Xbox 360 Faceplates: 2,016
Cheat Codes: 1,706

Latest News

Bulwark: Evolution Out Now on Consoles

Bulwark: Evolution Out Now on ConsolesThis major free update, which has already been successfully launched on Steam, brings a new layer of depth, strategy, and innovative gameplay mechanics to the immersive world of Bulwark: Falconeer Chronicles.


Thrustmaster Unveils T.Flight Hotas One

Thrustmaster Unveils T.Flight Hotas OneThrustmaster’s best-seller is back with a new look featuring the official license of Microsoft Flight Simulator. This complete, precise and easy-to-use hands- on throttle and stick (HOTAS) is the ideal companion for Microsoft Flight Sim 2024


See News Archives

Community Forum Activity

KeyWe Giveaway!
Post by Variation-XBA
0 Replies, 28587 Views

2021: XBA is still here
Post by shrew king
40 Replies, 275828 Views

Watch Dogs: Legion
Post by Nato King
0 Replies, 128906 Views

Xbox Series X or S
Post by Nato King
5 Replies, 147218 Views

Spellbreak Grand Magus Pack (3) and Starter Pack (7) Giveaway!
Post by Variation-XBA
0 Replies, 133495 Views

I pay $ 1000! I search the Element 54 Canadian launch Team signaturen Faceplate
Post by Smill
0 Replies, 157621 Views

Xbox one no signal
Post by debrartin
0 Replies, 146610 Views

do you remember?
Post by SnoochyBoochy
3 Replies, 220467 Views

i haz xbox
Post by SnoochyBoochy
0 Replies, 177351 Views

Claiming the first thread of 2020
Post by Kraft
7 Replies, 269067 Views

Important! I pay $ 1000! I search the Sweden launch and the Element 54 Faceplate
Post by Smill
3 Replies, 151933 Views

Squad Up
Post by samslophead
0 Replies, 261959 Views

TERA Skinned Xbox One X Giveaway!
Post by Variation-XBA
0 Replies, 181398 Views

Starfield Release expectations?
Post by DJ tx
4 Replies, 314500 Views

Issue with Xbox live on Xbox home
Post by rcmpayne
0 Replies, 169974 Views

© 2000-2024 XboxAddict.com - All rights reserved. All trademarks are properties of their respective owners.
Xbox is a registered trademark of Microsoft. XboxAddict.com is not affiliated with Microsoft.

Made in Canada
Site Design by Cameron Graphics